Monday, October 27, 2014

Halloween Treats

Do you need a LAST minute Halloween treat for your child's class? your own students? Neighbors? Friends? 

These can be used for ANYONE 
& are super CuTe 
& super easy!!

Genius Halloween Treat for the Kiddos- they have 15 packs of them at the dollar store!! Parents can keep an eye on them when it's dark- and what kid doesn't like glow sticks!?!!


I doing these for Aubrey's class this year! They have packs of 5 glow sticks at the Dollar Tree! :)


Easy Party Favor Using Cupcake Liner and Clear Treat Bag, adaptable for any holiday or occasion


Halloween Marshmallow treat bags


Marshmallow Ghosts:
These are cute and easy here is what you need:
.  Pretzel bags
.  Black permanent marker
.  Bag of mini marshmallows (one bag made approx 10 ghosts)
.  Some cute holiday ribbon

FREE Halloween printables
{Download HERE}

484794d1cce13e3f00df2f796cbabce9d03e778efd9bd55d6d55ba3205006847 850×1,100 pixels

Print these bag toppers. 
Add some treats to a sandwich bag, then staple the bag toppers to the bag. 
WA-LAH...super cute treat!


TREAT your teachers! FREE TAGS

{Blooms Design Online..download HERE}

I'm making these for Aubrey's teachers with candy & a gift card! 


Hope ya'll have a great Halloween Week!!


Wednesday, October 22, 2014

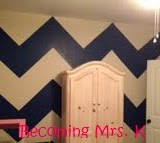
Chevron Wall

{More Pictures to Come...my computer is being weird for the moment.}

I have been pondering what to do on the walls in Aubrey's bedroom. The colors we have in her room are gray with accents colors of navy and green. We wanted it to be girly, but she's getting older and when our family expands--we didn't know if that would stay as her room. So we wanted a color scheme that would be flexible, and I am obsessed with navy!---so here we are! From the picture below...you can definitely see we needed some color! So we decided to conquer a CHEVRON wall.


Materials:
Paint (We used Indigo Cloth in Satin by Valspar)
Small Roller
Brush
Paint Tray
Painter's Tape
Chalking String
Measuring Tape
Level (Straight Edge)
Scissors
Pencil
Tarp/Sheet on the floor


I started by measuring the height and width of the wall. Then I tried to find a number of columns and rows that would definitely neatly into the measurements of the wall. 
My measurements were: 
Height: 105"
Width: 130.5"


So I decided on 6 columns because 130.5/6= 21.75" and I could mark that on a measuring tape. Then, I chose 5 rows because 105/5=21". I then drew this on a sheet on paper to give me an idea how it would look on the wall. After drawing the columns and rows on the paper, then you just draw a diagonal to create the chevron pattern. 

Next, it was time to take the paper to the wall. Yikes! I used a level to mark my measurements on the wall. (I was doing this by myself, so a measuring tape was difficult to keep sturdy by myself.) I mark off 6 columns that were each 21.75" and 5 rows that were 21". Then I took my chalking string, and taped it to the top of the wall on the mark I just made to create the lines of the columns. 


Once again, I taped it because I was by myself. Yes ladies, you can do this one by yourself!! 
 After I had all 6 column's lines, then I proceeded to do the same thing with the rows. I taped the chalking string to one side, pulled it to the mark on the opposite side, pulled tight, an popped the string to create the lines. In the end, I had 30 almost squares. 

Then, I took the level or straight edge and connected the corners of the "squares" with a diagonal. Each column's diagonals go the same direction to help you keep track. 

Next, I taped off the chevron. I used a blue colored pencil to place a mark on the blue spaces to help remember which ones would be blue. In order to tape it off correctly, you need to place the tape on the "blank" side of the diagonal. 

Now...all that is left is to paint! This is when my husband arrived home--for the easy part :)--and we brushed the lines & rolled the inside of the chevron!! 

We were THRILLED how it turned out!! Now one of these days....we will get to finishing the white walls with gray...one day! :)


Tuesday, October 14, 2014

Command Center

Command Center...what is a command center? This is what my husband was asking me when I asked him to paint a wall in our kitchen with chalkboard paint! :)

Now, it has become part of our daily routine! 


I went through many items to put on ours, and have finally found the items we need to fit our lifestyle! Along I am SURE it will change again! :)

Our Command Center includes:

-Monthly calendar (I print a few months ahead so I can see upcoming months as well.)


I'm keeping my eyes open for their 2015 calendar to be released! :)

-Weekly Calendar (This one is inside a frame for us to use as a dry erase.)


-Weekly Menu (I only plan for dinners, do this menu was perfect for us because I didn't need lunch and breakfast on it. It also has a shopping list, which is awesome!)


                                                                    {Found HERE}

-To Do List

-Attachable Bar for mail and other papers.

-Section for each family member for important reminders


I'm super excited to finally find a format that works for us! It definitely took many tries! 

How to you keep your family organized? 

What would you add I the command center? (One thing I want to add is a place to store chalk and dry erase markers.) 


Monday, August 11, 2014

MOVED IN....NOW WHAT? PAINT!!

We started with the huge wall in the living room, which we had no idea what to do with (and still a little clueless.) We did wait about two months after moving in to paint because we really wanted to be sure it was a color we loved. We found the color, Avocado from the Valspar line, in the Lowe's magazine. The magazine used it in the entire living room, but we thought that would be a little crazy for us so we decided on an accent wall--the HUGE wall. So Grant got to work!

We taped off the base board, outside walls, and ceiling. Then Grant rolled the wall with an 18"inch roller, which made it less than an hour project!! :)


And TA DA.....


We absolutely love it! Now....Just have to add our recently taken family pictures (Coming Soon!) to the wall.

The next project was a Chalkboard Wall! I have been eagerly wanting one for a while, and it took some persuading with the hubby. In the end, he loves it!


{Stay Tuned for the Command Center on the Chalkboard Wall!}

Now on to the next paint project....a Chevron Accent Wall.


Saturday, August 2, 2014

We've Moved!.....Glad it's over!


Moving...This one single word involves so many emotions!


If anyone has ever moved, you know our pain! :) It is such an exciting, nerve racking, busy time--so my emotions were a hot mess! Glad we survived, and our still here to enjoy it! I do not know how people move with multiple kids, across the country, with years & years worth of stuff--more power to you! Luckily, we were just moving across town. During the process, I was looking for anything to make the move easier or definitely the most organized it could be! Here are some ideas that we used:

We had tons of paperwork to deal with and I also had many ideas for the new house--paint colors, furniture, etc. that I wanted to keep together. We created a New Home Binder. While we were looking, it contained properties we liked, bank information, paperwork from our Realtor. After we made an offer, this binder turned into contracts, moving documents, insurance, etc. We found an awesome source at Sweet Tea and Saving Grace. It has awesome printables to put into your Home Binder!
{Photo: Sweet Tea and Saving Grace}

Click here to check out the New Home Binder! 

After moving our binder consists of warranties, companies we used & their contact info, paint colors we chose, etc. It is definitely something you will use for years to come!

What else could you include in your binder??

I chose to organize our rooms by a color so every list, label, and box would have the color on the room to help organized were ALL of our STUFF (as my husband would say) went! Bowl Full of Lemons has a great use of the color coding system. I found an awesome printable at The Project Girl with rooms listed already--I took these labels, and printed them on a full sheet of label paper. Then I wrote the contents with the color's room. 

{Photo: The Project Girl}

Click Here to get the Moving Label Printable!

So I needed: Label Paper, Printer, Colored Pens/Markers, Room Color Code---to organize all of our stuff!

(If you don't feel like using label paper, you can always print them on normal paper then cut & tape them to your boxes.) 

Now, you have arrived in your new home after a successful, organized moved! WAHOO!! That's how I felt until I realized all of the boxes had to be unpacked, and once again organized into their places! We're still working this--2 months later! :) 

When moving into a new neighborhood, we definitely wanted to get to know our neighbors. We decided to bake cookies (quick, easy, cheap), and of course I looked up a printable to find to attach to our cookies. Thanks Craftaholics Anonymous I loved this tag because it could be attached to anything: baked goods, wine, small gift, whatever! 


Click here to get the printable! 

Here's to Happy Moving, Homes, and New Neighbors!