{More Pictures to Come...my computer is being weird for the moment.}
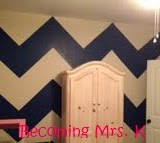
I have been pondering what to do on the walls in Aubrey's bedroom. The colors we have in her room are gray with accents colors of navy and green. We wanted it to be girly, but she's getting older and when our family expands--we didn't know if that would stay as her room. So we wanted a color scheme that would be flexible, and I am obsessed with navy!---so here we are! From the picture below...you can definitely see we needed some color! So we decided to conquer a CHEVRON wall.
Materials:
Paint (We used Indigo Cloth in Satin by Valspar)
Small Roller
Brush
Paint Tray
Painter's Tape
Chalking String
Measuring Tape
Level (Straight Edge)
Scissors
Pencil
Tarp/Sheet on the floor
I started by measuring the height and width of the wall. Then I tried to find a number of columns and rows that would definitely neatly into the measurements of the wall.
My measurements were:
Height: 105"
Width: 130.5"
So I decided on 6 columns because 130.5/6= 21.75" and I could mark that on a measuring tape. Then, I chose 5 rows because 105/5=21". I then drew this on a sheet on paper to give me an idea how it would look on the wall. After drawing the columns and rows on the paper, then you just draw a diagonal to create the chevron pattern.
Next, it was time to take the paper to the wall. Yikes! I used a level to mark my measurements on the wall. (I was doing this by myself, so a measuring tape was difficult to keep sturdy by myself.) I mark off 6 columns that were each 21.75" and 5 rows that were 21". Then I took my chalking string, and taped it to the top of the wall on the mark I just made to create the lines of the columns.
Once again, I taped it because I was by myself. Yes ladies, you can do this one by yourself!!
After I had all 6 column's lines, then I proceeded to do the same thing with the rows. I taped the chalking string to one side, pulled it to the mark on the opposite side, pulled tight, an popped the string to create the lines. In the end, I had 30 almost squares.
Then, I took the level or straight edge and connected the corners of the "squares" with a diagonal. Each column's diagonals go the same direction to help you keep track.
Next, I taped off the chevron. I used a blue colored pencil to place a mark on the blue spaces to help remember which ones would be blue. In order to tape it off correctly, you need to place the tape on the "blank" side of the diagonal.
Now...all that is left is to paint! This is when my husband arrived home--for the easy part :)--and we brushed the lines & rolled the inside of the chevron!!
We were THRILLED how it turned out!! Now one of these days....we will get to finishing the white walls with gray...one day! :)


No comments:
Post a Comment